The instructions below explain how to create a CSV file from SEEMIS for importing into the library system.
Designing the CSV file within SEEMIS
- Open the SEEMIS program and from the main horizontal bar running across the top of the window, click Application / Reports / Custom Reports

Ensure the system is currently in the Design tab.

- From the list running vertically on the left side of the screen, double-click on the Student node to expand the list of nodes that fall under it.

Double-click the second Student node to expand the list further and see the list of available fields for the prospective CSV file.

- From this state, simply drag-and-drop the appropriate fields over to the blank wide space to the right of the list.


- The minimum required fields for Eclipse.net and Junior.net are as follows:
- Date of Birth
- Gender
- Forename
- Surname
- Registration group
- Year/Stage
- Candidate Number
These fields do not have to be added in any particular order. Please note that the Candidate Number field can be found in the SQA node (rather than the student node) as shown below.

- At this stage the preview at the foot of the screen should include all of the required fields and it is ready to be exported. Please double-check that the required fields have been dragged-and-dropped before proceeding to the next stage.
Exporting the Data
The instructions in this part of the document explain how to copy the data from SEEMIS into a CSV.
- Continuing from the step above, click on the View tab in the SEEMIS program.

The student data will be show in a full screen view.
- Click on any cell in the displayed grid and press Ctrl + A. This step will select all of the student data and the entire grid will be highlighted.
- CTRL + C to copy all of the student data (nothing will appear to change on the screen).
- Open a blank spreadsheet in Microsoft Excel and click on the first cell (usually this is cell ‘A1’). If Excel is not available, please use any other spreadsheet-based application that can handle CSV files.
- Press CTRL + V to paste the same student data into the spreadsheet. The data and layout will look very similar to what was displayed above.
- In some cases you may have to manually assign the header names within the CSV File (this can be done during Step 7).

Save the file in CSV format.
- Navigate to the folder where the CSV file was just saved, right-click on it and choose to open with Notepad. As some of the column headers from SEEMIS are not the same as the ones in the library system, you are required to change them as described in the table below.
| SEEMIS Column Header |
Change to |
| Date of Birth |
DateOfBirth |
| Year/Stage |
YearGroup |
| Registration Group |
TutorGroup |
| Candidate Number |
ManagementSystemID |
The first row of your CSV file should now look like this:
DateOfBirth,Gender,Surname,Forename,YearGroup,TutorGroup,ManagementSystemID
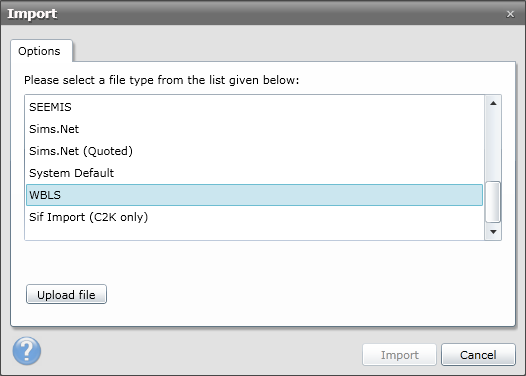
- After completing these instructions you are now ready to move on to the next stage. Please note that when you come to import the CSV file, you should select the "WBLS" option when prompted.